
No products in the cart.
TileWise Cartoons
Plan Your Installation Layout
About Plan Your Installation Layout
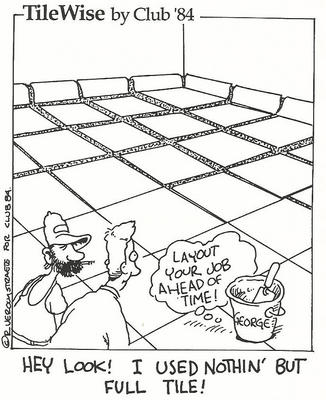
The tile installer in the cartoon is bragging about only using full tile, but the grout joint size keeps increasing towards the room’s corner and the installation and is most certainly unacceptable to Mr. Homeowner. Laying out a tile or stone installation correctly is critical to the aesthetic success of the final product. The layout process is not only necessary to plan where to start full tiles and where the cut tiles will be placed, but it can also be used to check the squareness of the area to be tiled.
ANSI A108.02-2016 Section 4.1 Inspection of surfaces and conditions states, “Prior to commencing with the tilework, the tile contractor shall inspect surfaces to receive tile and accessories, and shall notify the architect, general contractor, or other designated authority in writing of any visually obvious defects or conditions that will prevent a satisfactory tile installation.” ANSI A108.02-2016 Section 4.1. states, “Surfaces to receive tile shall be plumb, level, and true with square corners.”
The layout process helps with meeting these ANSI requirements by running reference lines first that are used to check the area for squareness. A room that is out of square can have a negative impact on how the tile lays out and is most likely the cause the uneven grout joints in the cartoon. Performing a proper layout process and room squareness check correctly will help avoid costly mistakes, rework, and a bad reputation.
About the Tilewise Cartoons
TileWise cartoons were developed under Donato Pompo's leadership for Club '84 (Ceramic Tile Action Group). Club '84 was a non-profit organization of accomplished individuals from all segments of the ceramic tile industry. The group's mission was to develop and distribute educational aids to educate, train and bring quality awareness to the distributors, specifiers, installers, and consumers of Ceramic Tile.
The TileWise cartoons were created to communicate issuses and concerns in the business of using ceramic tile for all segments of the industry. The objective was to educate to promote the quality use of ceramic tile. In each cartoon the screen exaggerates what you shouldn't do or emphasizes an issue or concern, then George the Bucket (named after CTI founder George Lavenberg) says what is correct. The cartoons ran for twelve years in each issue of the Tile Industry News, a major industry publication, published by the Ceramic Tile Institute until 1999 when it ceased.
Use these cartoons to educate your customers and employees to help avoid potential problems, and to promote a positive image of your company through newsletters, posters or mailings.
We hope you can put these cartoons to good use to help your industry and your business, and we know you will certainly benefit from them if you do. Good Luck!
The TileWise Cartoons will be displayed and available for your use. Restricted to limited single use. Randy’s cherished wife, Suzanne, is working hard to care for their precious sons, Rudie and Remie. Randy’s sudden illness left them with limited resources. If you can benefit from the use of the TileWise Cartoons, and if you can afford it, a donation to Randy's family would be very much appreciated. Please see form below to pledge whatever amount you would like to donate.
Right click the cartoon of your choice (Restricted to limited single use) and do a "Save Picture As..." to your hardrive.
(over 50 TileWise cartoons for your pleasure, and to use to educate your customers and employees)
Please take the time to learn about Randy.
Fill out my online
form.