No products in the cart.
Case Study
Investigation of Exterior Veneer Porcelain Tile Falling Off
The Problem
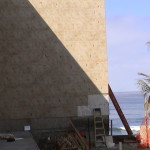
Investigation of Porcelain Tile Falling From Exterior Veneer of Building Background: A 20 x 36 inch glazed porcelain tile was installed over the plaster substrate on the exterior walls of a 4 story condominium project. After about 90 days someone carrying a ladder bumped into the tile on the wall and the tile fell off. CTaSC was retained to investigate the cause of the tile falling from the building and to determine if it was an isolated problem or if there was a systemic problem that could be a life safety issue. Request: CTaSC was asked to investigate and inspect the exterior veneer tile installation to determine the cause of the tile debonding, to determine the extent of the problems, to determine if the installation met industry standards, and to determine how best to remediate the problems.The Solution
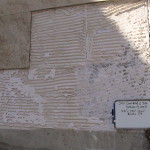
Inspection Findings:- I inspected the areas where there were missing tiles. We could see the trowel ridges of the thin-set mortar adhesive and most them were not collapsed. There were a limited number of areas where the tile had been bonded. The thin-set on the wall and on the back of the tile seemed very hard and well bonded to those respective surfaces.
- I then randomly tapped other tiles and found that some tiles sounded well bonded, but many tiles had hollow sounds that covered from 20% to 75% of the tiles surface area.
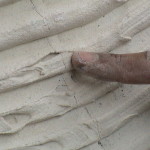
- I gently pulled on some tiles and detected the tile moving, which was another indication the tiles were not well bonded.
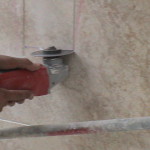
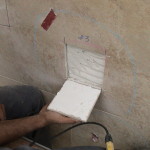
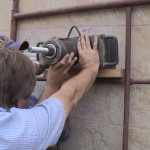
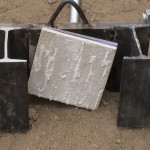
- We cut out 6x6 inch sections of tiles that had hollow sounds and tiles that had a solid sound, so we could epoxy the tensile pull plates to the tiles for testing. When we removed the hollow sounding tiles they fell from the wall by themselves, thus their tensile bond strength was zero.
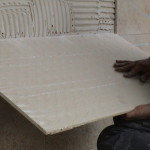
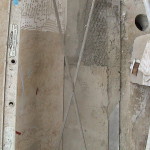
- In some cases the tile was back-buttered with a thin coat of thin-set and some cases there was no thin-set. In each case the thin-set mortar was applied to the plaster wall with a 3/4" marble loop trowel, but it wasn't applied thick enough to reach the back of the tile due to the plaster substrate not being flat and within plane tolerances of 1/8" in 10 feet or within 1/16" in 24 inches.
- Tiles that sounded solid were tested and their tensile bond strength ranged from 18 psi to 40 psi, and the failures were cohesive within the plaster substrate.
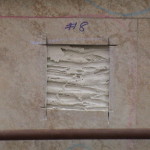
- I found a tile that sounded fully hollow. We cut the grout joints out around the perimeter of the tile and as we did the tile came completely loose and there was no thin-set on the back of the tile. The plaster substrate had thick marble trowel ridges of thin-set mortar adhered to it.
- There was a continuous vertical crack in the thin-set mortar. When the thin-set was removed we discovered that they had installed the tile over a plaster control joint, which is against industry standards. The control joint should have continued through the tile and filled with a flexible sealant.
- It was determined that the hollow portions of the tile were not bonded at all, but the solid sounding portions of the tile were bonded well.
- We found that most of the tiles were excessively hollow and not safely attached to the wall.
- The plaster substrate was not properly plumb and flat within industry standards, so the tile installer should have corrected it before installing the tiles.
- Even though the tile installer used a lot of thin-set mortar, he didn't use enough for the thin-set to make full contact to both the plaster substrate and the tile. Industry standards requires 95% contact.
- If the installer had pull tiles as they were being installed, as industry standards require, to verify he was achieving adequate thin-set contact, he would have realized he wasn't and could have corrected the problem.
- Compounding the problem was that the tile was installed over plaster control joints and the tile did not have any movement joints as industry standards require movement joints every 8 to 12 feet in each direction.
- Before I left the job site, I did tell client that I thought leaving the tile on the building could be a hazard. If there were an earthquake, I would expect that a substantial amount of the tile would shear off the building.
- It was my recommendation that all tiles on the exterior veneer be removed and replaced. During the new installation the substrate needs to be properly prepared and repaired as needed. A high strength latex or polymer modified thin-set should be used to install the new tile. The tile should be back-buttered and should substantially achieve 95% coverage with no voids in the back of the tile.
- Movement (Expansion) joints in the substrate should continue through the tile and overall expansion joints should be installed every 8’ to 12’ in each direction per TCNA method EJ171.
- There should be a quality control plan in place during the re-installation to assure a quality and a substantial installation.
Photo Gallery